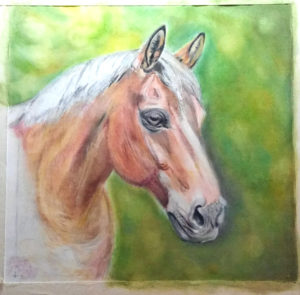
STEP 1
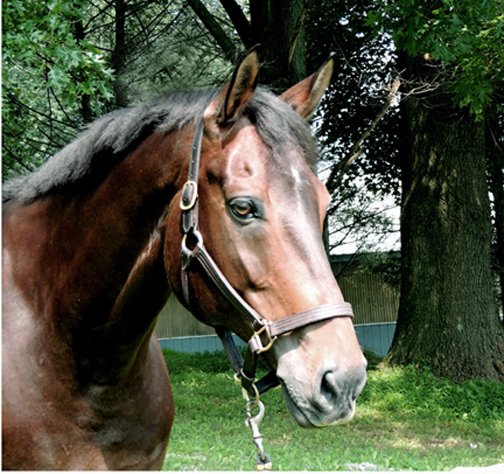
This is a commissioned equine portrait. My client picked out her favorite among what I considered the best reference photos that were taken of her beautiful Warmblood gelding. He is a very photogenic horse, so it was a difficult choice, as he looked good in many of the shots! She wanted this equine portrait done in colored pencil, and wanted the horse painted without his halter (which he was wearing in the photos). We decided the background would be rendered in an abstract way, using some of the colors of the actual photo’s background.
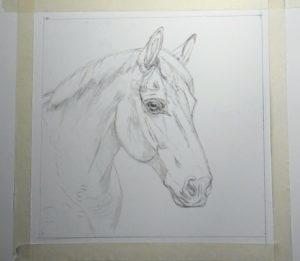
I decided to do this portrait on white Clairefontaine Pastelmat, using colored pencil blended with solvent (Zest-It). The size of the portrait would be 13″ x 13.” After I was satisfied with my outline drawing, I transferred it onto the Pastelmat surface with graphite paper. I put a border of artist tape around the edges so that I wouldn’t go outside the borders of the painting. Once peeled off, the tape gives a nice, clean, sharp edge, even if you color over it. I actually made the dimensions of my working surface about 1/2″ larger than the 13″ x 13″ size, to allow for a slight variation in the mat size when the portrait is framed.
STEP 2
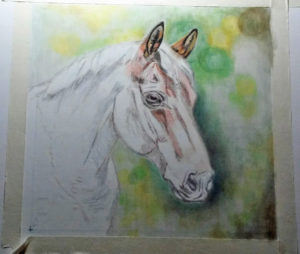
Here I have made a start on putting some colors and shapes in the background. I like to see some background color against the subject’s face, as it helps me to judge my values when painting the subject. Then I began to put a little color into the face. This is what is called “the ugly stage” that all paintings go through in the earlier phases. Artists know that every piece of artwork goes through these awkward stages. It’s a bit scary, but all part of the process, and we know we have to carry on through it, and as additional work is done on the painting, it will start to look closer to our goal!
Since I had never worked on this surface before, I decided to do the ears first, to see how the colored pencil and solvent reacted on the Pastelmat. If I didn’t like it, I could start again on another surface before I had invested too much time on the piece. Here the ears are nearly completed. I liked the way the CP and solvent worked with the Pastelmat, so I felt confident to go on with the rest of the painting.
STEP 3
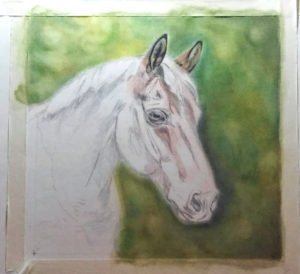
More work on the background here. I used various shades of greens, golds and browns, first putting in light layers of colored pencil, blending with solvent, letting it dry, and then adding more layers. I think the background often is the most tedious and difficult part of a portrait! 🙂 The effect I wanted was a blurred, semi-bokeh background that would complement the horse’s bay coat color, while keeping the attention on his face. I didn’t want a full bokeh effect, as I thought it would be too distracting.
STEP 4
Now that the background is filled in, I can start working on the horse’s face. At this stage, it is starting to take form, which makes the process more enjoyable, as I can now see where I’m going!
STEP 5-A

A lot of work between the last step and this one! I have blocked in the color all over the horse. Colored pencil is a slow medium, as you must work in many layers, applying light pressure with the pencil so that you don’t fill up the “tooth” (texture) of the surface too soon, which would prevent additional layers from being added — what artists call being “locked out.”
Of course, since I’m blending each layer with solvent, I am able to build more layers than would be possible with colored pencil alone. The solvent dissolves the wax and oil binder and allows the pigment to sink into the surface, so most of the tooth remains.
STEP 5-B
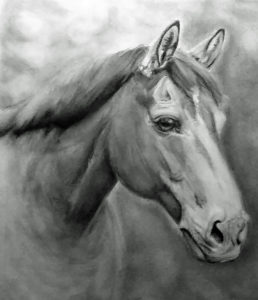
After photographing the painting at Step 5, I converted it to grayscale so I could check my values (tones/lights and darks). A good way to know if your values are correct is to view your painting in black-and-white so you can see all the various shades. If the piece can stand on its own with just the tones and no color, you are on the right track.
I won’t be going quite as dark in the shadow areas as they look in the reference photo, as the camera usually shows shadows darker, and the human eye sees more nuances than a camera lens can. Also, there was lots of reflected light on the shadow side of the horse, as it was a sunny summer day. At this point, I am fairly well satisfied with the way things are going.
STEP 6
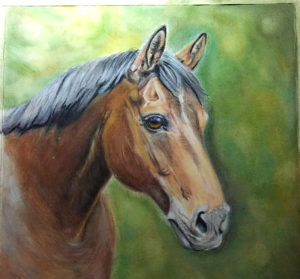
Refining the mane, adding more layers of color to the rest of the horse, plus some more adjustments to the background. It’s important to let each layer dry thoroughly after blending it with the solvent, before adding more layers.
STEP 7
More layers added, more refinements done. At this point I sent a progress shot to my client, the horse’s owner, to get her approval before moving on. The client was happy with the portrait so far and requested a couple of minor adjustments. She thought I captured her horse’s expression and “his eye.” So now it’s time to close in on the final details!
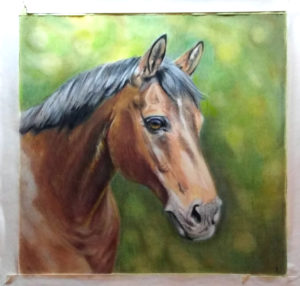
STEP 8 – FINISHING TOUCHES
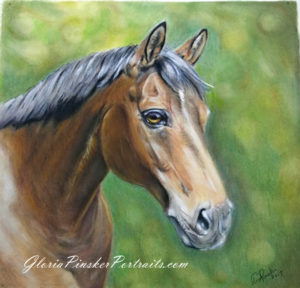
I added the finishing touches, working a bit more on the tones and color, adding highlights to the eye and refining the background a bit more. Then I signed the painting with my name and the year. It’s always hard to know when to stop, but at some point you just have to acknowledge that you’ve done your best, and move on. Otherwise, we’d hold on to our pieces forever!
Recent Comments